Week 9 Update
1. I began transferring my CG scenes from Maya to Houdini, so everything will be rendered in Karma moving forward. I did this because I feel as though working in COPs and using USD shaders is a more flexible workflow for lookdev.


2. In Nuke, I did a rough comp where I removed an object from Estelle from a live action shot (we had to use carrots to make the dog sniff the doll). The workflow for that seems quite simple. I also color corrected another shot in Nuke, and color graded it in After Effects, I am considering switching to Resolve for coloring when we get closer to the final cut.
Before
Rough Comp (Carrot Removed)

RAW

Color Corrected

Color Graded
Week 8 Update
1. I improved the textures on Estelle and the Gloves. For Estelle, I readjusted the displacement maps for the fibers of the fabric to seem softer and more subtle. Additionally, I added short fur around Estelle's body as the fabric on the doll had the same effect. I painted splotches and imperfections on the Gloves to make them seem more like real oven mitts. I also turned down the hardness on the height map on the Gloves.


2. I animated Estelle for the sequence where she floats out the the chair out of the interrogation room, and falls down into the live action scene.
3. I created an animated title sequence in After Effects for the beginning of the short film.
4. I changed the shapes of the stars in my outer space environment from spheres to 5-sided stars that emulated the popular glow-in-the-dark decals that you'd see on the ceiling of a child's room. I also added more depth in the background by adding clouds of purples and blues instead of a flat black.

Week 7 Update
1. I went through every shot ( there are 18 as of right now) and made a little bit of progress on each one and compiled it into an updated edit. For the live action shots, I retimed them for better pacing (still experimenting with it). I made a lot of updates on the second and third scenes, where I integrated the CG version of the doll into several of the shots. I also updated some texturing and did some preliminary animation.
2 Weeks Prior

Scene B Shot 1

Scene B Shot 3

Scene B Shot 4

Scene B Shot 6

Scene C Shot 4
2/22/26

After: Stars in BG, UFO textured, moon texture changed, door modeled for gloves to come out of.

After: Preliminary textures added, spoon animation looks a little more natural, clay pieces are more like play dough, more sequins.

After: CG doll integrated into the shot, textures on the Gloves are updated. Stars are in BG

After: Final models with some texturing done.

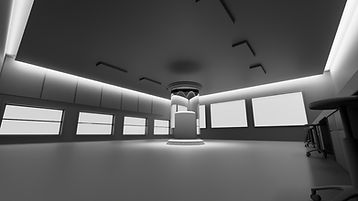
After: Lighting is more dramatic, CG doll sitting in high chair. Some texturing is done on the walls and floor.
2. To create the environment for the outer space sequence, I created an HDRI within Houdini. First, I randomly scattered points along a sphere, and assigned smaller spheres along those points. I added a material with the emission set to 1.0, and rendered the scene with a camera that took 10 shots rotating 360 degrees. I stitched each image together to create a panorama/HDRI in Photoshop.

3. I rigged the CG doll in Maya using the HumanIK and other deformers for the face.
Week 6 Update
1. I captured 3D Scans of the practical doll (shot with Canon Eos Rebel T3i) and read the files into Meshroom. I cleaned up the topology in Maya, and it is ready to texture and rig!


2. In Houdini, I continued to work on the mixing bowl shot. I cleaned up the animation a little bit and added some rough textures and lighting to the scene. In order to create the background with stars, I scattered points on a large sphere and assigned smaller spheres to the points to create a starry sky. I stitched together the renders of this scene to create my own HDRI to use in all of the outer space shots.

Week 5 Update
I worked further on modeling and texturing props/environments, I also curated a new edit to show my overall progress on this film so far.


Week 4 Update
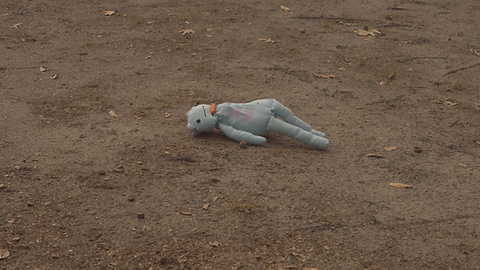
1. I completed shooting all my live action footage this weekend. I shot RAW on Blackmagic Ursa Mini Camera with Canon Tamron 35-150 mm f/2.8-4 Di VC OSD Lens at 50 fps to create a smooth effect when the clips are played at 24 fps. The two actors featured are Sydney Relkin (SCAD VFX student playing as the child) and Lolly (the dog), the filming location was at Lamara Heights Park in Savannah, GA.
** One shot from the shoot. See more in the updated edit above
2. I began simulating the mixing bowl shot using RBD in Houdini. The dynamic objects in the bowl are chunks of clay and sequins. I also sculpted the astronaut's hand for Scene B Shot 5.


Week 3 Update
1. Before the official shoot, I did some camera tests to become comfortable with the camera, figure out approximately how long production will take, and to finalize shot designs. The actor is a stand-in for now (Thank you Darby!)


2. I created an updated (partial) edit on my progress so far this quarter. I highlighted the main improvements I've made since my last animatic in the fall.
Week 1-2 Update
Progress so far of models (all done in Maya) with preliminary lighting and a little bit of texturing.